
martes, 16 de junio de 2009
Listas Vinculadas desde Access limitadas a 100 elementos

Validaciones Custom en Sharepoint
Realizar validaciones custom de diversos campos en sharepoint, con mucha mejor apariencia y usabilidad, sin hacer post.
Ingredientes:
Un a lista a validar.
Suite Jquery (Son los ficheros javascript que se encuentran en el paquete Rar que os proporciono).
Un array creado en una variable javascript con los nombres de los campos a validar.
Fichero Validaciones.js que he preparado para este objetivo
Receta:
Paso 0) Descomprimir el paquete que contiene el código js y la suite jQuery en la carpeta "js" (hay que crearla) en la raiz del sitio.Descargalo de aquí :
http://www.robertomarcos.com/validaciones_codigo.rar
Paso 1) Abrir el NewForm.aspx
Paso 2) Ocultar (Hidden) el WebPart de formulario automático (ListFormWebPart)
Paso 3) Añadir nuestro formulario Custom debajo del ListFormWebPart con los campos del tipo NewItemForm (o de tipo EditItemForm para la pagina EditForm.aspx)

Paso 4) Pegar en el interior del tag <asp:Content ContentPlaceHolderId="PlaceHolderMain" runat="server"> la inclusión del script
<script type="text/javascript" language="javascript" src="../../js/validaciones.js" ></script>
Paso 5) Pegar en el interior del tag <asp:Content ContentPlaceHolderId="PlaceHolderBodyAreaClass" runat="server"> este script el cual hay que preparar incluyendo los tipos , nombres y mensajes en caso de error de los campos
Hay que poner los campos en la matriz de esta forma:
'TIPO1', 'FIELDNAME1', 'TEXTO A MOSTRAR1',
.....
'TIPO N', 'FIELDNAME N', 'TEXTO A MOSTRAR N'
Los tipos admitidos son input, select (Para combos y lookup) y selectespecial (Para lookupfield con mas de 20 elementos)
<script language="javascript" >cadenaCampos = new Array(
'select','Tratamiento','Seleccione un -Tratamiento- válido',
'input','Nombre','Tiene que rellenar el campo -Nombre-',
'input','Apellidos','Tiene que rellenar el campo -Apellidos-',
'input','Telefono','Tiene que rellenar el campo -Telefono-'
//'selectespecial','NombreComboAjax','Seleccione un -Nombrecombo con mas de 20 elementos- válido' );
</script>

Nota:
Si ponemos algún FieldName que no exista, saca un mensaje de error como un alert normal y hay que tener en cuenta que el error se produce en el javascript por no encontrar el objeto, por lo que hasta que estén bien puestos los fieldName de los campos a validar (Que no tienen porque ser todos) no va a funcionar correctamente.
Paso 6) Poner el botón de save el redirect to source y el "if (validaVacios(cadenaCampos))" , os quedara así:
<input type="button" value="Save" name="btnSave" onclick="javascript: if (validaVacios(cadenaCampos)) {ddwrt:GenFireServerEvent('__commit;__redirectsource')}" />

Paso 7) Abrir el EditForm.aspx
Paso 8) Añadir nuestro formulario Custom con los campos de tipo EditItemForm para la pagina EditForm.aspx
Truco: Yo suelo copiar la tabla que contiene los campos del Web part de la pagina de nuevo y les cambio campo a campo la propiedad CONTROLMODE a de NEW a EDIT así no tengo que repetir el formulario completo
Paso 9) Repetir desde el paso 2
Paso 9.1) Filtrar el formulario custom de editForm mediante un parametro ITEMID que recoja la variable ID de la QueryString, porque si no, siempre editara el mismo elemento , esto lo he explicado en post anteriores.
Paso 10) Probar y Darle calor :D
Aquí os dejo unas capturas de pantalla del resultado final.
RobertoMarcos.com
http://sharepointworks.blogspot.com/
miércoles, 3 de junio de 2009
Cambiar el Propietario(Autor) y el Editor de un ListItem
No podemos cambiar el propietario de un Elemento de Lista.
Ni en Edición ni vinculando una lista, ni desde excel ni desde access
Motivo:
Los campos sharepoint Propietario (autor) y Editor son de solo lectura, por lo que los renderiza en Modo Visualización.
Solución Para Edition via Web:
1º Abrir el EditForm.aspx de la lista a la que queremos cambiarle los propietarios de los listItems
2º Crear un dataFormWebPart en la parte inferior usando el Sharepoint Designer
3º Incluir Los campos @Editor y @Author insertando con la opción Single EditForm

4º Filtrar la lista para
4.1 Crear un parámetro al web part ITEMID mapeado al valor de ID de la querystring (Poner valor por defecto"1")

4.2 Ajustar el Filter con el designer Poniendo ID=ITEMID

5º Buscar
<xsl:value-of select="@Author" disable-output-escaping="yes"/>
Cambiarlo por:
<SharePoint:FormField runat="server" id="Author{@ID}" ControlMode="Edit" FieldName="Author" ItemId="{@ID}" __designer:bind="{ddwrt:DataBind('u',concat('Author',@ID),'Value','ValueChanged','ID',ddwrt:EscapeDelims(string(@ID)),'@Author')}"/>
6º Buscar
<xsl:value-of select="@Editor" disable-output-escaping="yes"/>
Cambiarlo por:
<SharePoint:FormField runat="server" id="Editor{@ID}" ControlMode="Edit" FieldName="Editor"
ItemId="{@ID}" __designer:bind="{ddwrt:DataBind('u',concat('Editor',@ID),'Value','ValueChanged','ID',ddwrt:EscapeDelims(string(@ID)),'@Editor')}"/>
7º Pulsar en el Botón save y añadirle el FormAction de RedirectToSource
8º Guardar
Consejo de Seguridad: Se puede ocultar el webpart si no se tiene permiso así solo un administrador podría hacer estas cosas.

Solución para cargas Masivas:
Crear un miniworkflow que cambie el propietario cogiendolo de un campo de texto creado para ese efecto.
Aquí dejo un trozo de código que puede ser útil.
SPSite site = new SPSite(siteUrl);
SPWeb web = site.OpenWeb();
web.AllowUnsafeUpdates = true;
SPList list = web.Lists["Test"];
SPListItemCollection collection = list.Items;
foreach (SPListItem item in collection )
{
SPUser user = web.EnsureUser(UserName Login Name);
//1073741823;#System Account //User name values are in this format ID;#Login Name
string value1 = user.ID + ";#" + user.Name; //Create in same format
item["Author"] = value1; //for Created By field
item["Editor"]=value1 ; //Modified By field
item.Update(); //Update the item
}
list.Update();
web.Update();
Se buscan ideas para Implementar WepParts o Utilidades para Sharepoint
Estoy buscando ideas y gente para implementar software libre para Sharepoint, por mi parte ofrezco implementación de las peticiones totalmente GRATIS.
Según se me van ocurriendo y voy necesitando he desarrollado varias utilidades.
Entre los proyectos que tengo en mano están:
- Sincronizador de Listas contra bases de datos ODBC. (WebPart y EXE para linea de comando)
- Generador de Listas basado en un XML de estructura (WebPart y EXE) ( http://listgenwp.codeplex.com )
- Web part de Gráficas Animadas incrustando Gráficas Libres del proyecto Flot , alguna de Fusion Charts y conexión directa con listas, ficheros Excel y ODBC
- Migrador de estructuras a sharepoint desde base de datos Access , Sql Server y MySQL
- Utilidad de reparación de Listas Estropeadas y corruptas (EXE)
- Migrador de soluciones STP que contengan paginas customizadas con corrección de GUIDs.
- Generador de Consultas para de Acceso directo (ODBC) a la Base de datos de contenido SQL Server (No esta recomendado pero es ultra Rápido)
- Migrador de aplicaciones Access a Sharepoint usando un Generador de Formularios para Sharepoint con un analizador de Access VBA
En cuanto a seguridad nadie me ha pedido nada! Esa gente de sistemas que se anime y participen.
ESPERO VUESTRAS PETICIONESSaludos a toda la comunidad.
RobertoMarcos.com
miércoles, 20 de mayo de 2009
Repairing Supporting Files: “SharePoint alerts doesnt work” & “Invalid page URL”
We have the form customized and ready and working but suddenly… just when we are going to make use of the alert system of Sharepoint, it doesn't work, throwing the message "Unknown error" when trying to subscribe to an alert.
The option for New, Display or Edit list items makes the error: "Invalid page URL".
Cause:
The bad functionality of these alerts is related with the messages "Invalid page URL" when creating a newListItem or the error "An unexpected error has occurred" when we do click in the edition of a listItem. They both produce when corrupting a Sharepoint List though the Supproting files remain unconfigured.
The problem happens when customizing an ASPX page like editform or newform, because we have deleted the ListFormWebPart which comes by default.
Correct customization procedure (Official):
If you want to customize the controls which appear in the NewForm.aspx and don't want to show the ListFormWebPart which appears by default, we can hide it instead of deleting it following these steps:
1. Start Sharepoint Designer 2007 and open the NewForm.aspx page from the list.
2. Right click on the ListFormWebPart and then click Web Part Properties.
3. Expand Layout, click on the checkbox "Hidden" and finally click "OK".
Procedure for repairing a screwed page or list:
The old procedure was… delete the list and create it again for personalize it later using the procedure, but there is another way.
1. Open the NewForm.aspx, EditForm.aspx and DispForm.aspx in the Sharepoint Designer.
2. Search the following tag: <WebPartPages:WebPartZone runat="server" FrameType="None" ID="Main" Title="loc:Main"><ZoneTemplate> in the screwed page.
3. Paste between the tags <ZoneTemplate> Paste here <ZoneTemplate> this code:
<WebPartPages:ListFormWebPart runat="server" __MarkupType="xmlmarkup" WebPart="true" __WebPartId="{MY NEW GENERATED GUID}" >
<WebPart xmlns:xsi="http://www.w3.org/2001/XMLSchema-instance" xmlns:xsd="http://www.w3.org/2001/XMLSchema" xmlns="http://schemas.microsoft.com/WebPart/v2">
<Title>LIST NAME</Title><FrameType>None</FrameType><Description /> <IsIncluded>true</IsIncluded><PartOrder>1</PartOrder><FrameState>Normal</FrameState> <Height /> <Width /><AllowRemove>true</AllowRemove> <AllowZoneChange>true</AllowZoneChange><AllowMinimize>true</AllowMinimize><AllowConnect>true</AllowConnect><AllowEdit>true</AllowEdit> <AllowHide>true</AllowHide><IsVisible>false</IsVisible> <DetailLink /> <HelpLink /><HelpMode>Modeless</HelpMode><Dir>Default</Dir> <PartImageSmall /> <MissingAssembly>Cannot import this Web Part.</MissingAssembly><PartImageLarge /> <IsIncludedFilter /><ExportControlledProperties>true</ExportControlledProperties>
<ListName xmlns="http://schemas.microsoft.com/WebPart/v2/ListForm">{MY SHAREPOINT’S GUID FROM THE LIST}</ListName>
<ListItemId xmlns="http://schemas.microsoft.com/WebPart/v2/ListForm">0</ListItemId>
<ControlMode xmlns="http://schemas.microsoft.com/WebPart/v2/ListForm">Edit</ControlMode> <TemplateName xmlns="http://schemas.microsoft.com/WebPart/v2/ListForm">ListForm</TemplateName>
<FormType xmlns="http://schemas.microsoft.com/WebPart/v2/ListForm">6</FormType><ViewFlag xmlns="http://schemas.microsoft.com/WebPart/v2/ListForm">1048576</ViewFlag>
<ID>g_MY_NEW_GUID_REPLACING_DASHES_BY_LOW_DASHES</ID> </WebPart></WebPartPages:ListFormWebPart>
4. In the line of <ControlMode if the page is:
EditForm we have to put Edit
NewForm we have to put New
DispForm we have to put Display
5. In the line of <FormType if the page is :
EditForm we have to put 6
NewForm we have to put 8
DispForm we have to put 4
6. In the line <ListName we have to put the GUID of the Sharepoint's List that we are repairing. Also change <Title putting the name of the list.
(It can be obtained in the Sharepoint Site by customizing the list or in "Site Settings > Site Libraries and Lists" and looking in the link of customize of the list appears the GUID, right clicking and copying the direct access)
The line would stay like this:
<ListName xmlns="htp://schemas.microsoft.com/WebPart/v2/ListForm">{046F5668-1891-4781-9B44-90AC0C0B600A}</ListName>
7. Generate a new GUID with guidgen.exe or using the page: http://www.somacon.com/p113.php
8. In the line <ID put the new GUID replacing the dashes by low dashes leaving a "g_" in the beginning. Example: If the GUID is 870850be-fd2c-44d6-818e-ab2914fb2d71 it should stay like this g_870850be_fd2c_44d6_818e_ab2914fb2d71
9. Save (I don't recommend to save before), it is possible that you must close and open again the page to see the result of the reparation.
10. Repeat this same operation for the pages NewForm.aspx, EditForm.aspx, DispForm.aspx and all of the attachments of Supporting Files will stay repaired. By this point we would have repaired the list, the alerts, the RSS and the actions of New, Edit and Display so:
Everything will work properly
Look before and after.

Thaks,
RobertoMarcos.com
martes, 19 de mayo de 2009
Reparación de Supporting Files: "Las alertas de Sharepoint No funcionan" e "Invalid page URL"
Tenemos el formulario personalizado listo y funcionando... pero de repente, cuando vamos a utilizar el servicio de alertas de sharepoint, este no funciona.
Arrojando el mensaje "Error Inesperado" al intentar suscribirnos a una alerta.
La opción de Nuevo, Visualizar o Editar elementos de lista, producen errores "Invalid page URL"
Causa:
Que las alertas no funcionen esta relacionado con los mensajes "Invalid page URL:" al crear un newListitem o el error "An unexpected error has occurred" cuando hacemos click la edición de un listItem
ambos se producen al corromper una lista de sharepoint ya que las SupportingFiles quedan desconfiguradas.
El problema ocurre al personalizar una pagina ASPX como editform o newform, porque hemos borrado el ListFormWebPart que viene por defecto.
Procedimiento correcto de personalización (Oficial):
Si quieres personalizar los controles que a aparecen en newForm.aspx, y no quieres mostrar el list Form Webpart que aparece por defecto, podemos ocultarlo en lugar de borrarlo siguiendo estos pasos.
- Iniciar Sharepoint Designer 2007y abrir la pagina NewForm.aspx de la lista.
- Pulsar el Botón Derecho sobre el List Form Web Part, y después pulsar Web Part Properties.
- Expandir Layout, hacer click para seleccionar checkbox Hidden , y finalmente pulsar OK.
El procedimiento antiguo era... borrar la lista y crearla de nuevo para personalizarla posteriormente usando el procedimiento, pero hay otra alternativa.
1. Abrir las páginas NewForm.aspx, EditForm.aspx y ViewForm.aspx en Sharepoint Designer
2. Localizar el tag <WebPartPages:WebPartZone runat="server" FrameType="None" ID="Main" Title="loc:Main"><ZoneTemplate> en la pagina Estropeada
3. Pegar entre los tags <ZoneTemplate> pegar aquí </ZoneTemplate>
este código :
<WebPartPages:ListFormWebPart runat="server" __MarkupType="xmlmarkup" WebPart="true" __WebPartId="{MI NUEVO GUID GENERADO}" >
<WebPart xmlns:xsi="http://www.w3.org/2001/XMLSchema-instance" xmlns:xsd="http://www.w3.org/2001/XMLSchema" xmlns="http://schemas.microsoft.com/WebPart/v2">
<Title>NOMBRE DE LISTA</Title>
<FrameType>None</FrameType>
<Description /> <IsIncluded>true</IsIncluded>
<PartOrder>1</PartOrder>
<FrameState>Normal</FrameState> <Height /> <Width />
<AllowRemove>true</AllowRemove> <AllowZoneChange>true</AllowZoneChange>
<AllowMinimize>true</AllowMinimize>
<AllowConnect>true</AllowConnect>
<AllowEdit>true</AllowEdit> <AllowHide>true</AllowHide>
<IsVisible>false</IsVisible> <DetailLink /> <HelpLink />
<HelpMode>Modeless</HelpMode>
<Dir>Default</Dir> <PartImageSmall /> <MissingAssembly>Cannot import this Web Part.</MissingAssembly>
<PartImageLarge /> <IsIncludedFilter />
<ExportControlledProperties>true</ExportControlledProperties>
<ListName xmlns="http://schemas.microsoft.com/WebPart/v2/ListForm">{MI GUID DE LA LISTA SHAREPOINT}</ListName>
<ListItemId xmlns="http://schemas.microsoft.com/WebPart/v2/ListForm">0</ListItemId>
<ControlMode xmlns="http://schemas.microsoft.com/WebPart/v2/ListForm">Edit</ControlMode> <TemplateName xmlns="http://schemas.microsoft.com/WebPart/v2/ListForm">ListForm</TemplateName> <FormType xmlns="http://schemas.microsoft.com/WebPart/v2/ListForm">6</FormType>
<ViewFlag xmlns="http://schemas.microsoft.com/WebPart/v2/ListForm">1048576</ViewFlag>
<ID>g_MI_NUEVO_GUID_REEMPLAZANDO_GUIONES_POR_GUIONES_BAJOS</ID> </WebPart>
</WebPartPages:ListFormWebPart>
4. En la línea <ControlMode si la pagina es :
- EditForm hay que poner Edit
- NewForm hay que poner New
- DispForm hay que poner Display
5. En la linea <FormType si la pagina es :
- EditForm hay que poner 6
- NewForm hay que poner 8
- DispForm hay que poner 4
6. En la línea <ListName hay que poner el GUID de la lista sharepoint que estamos reparando. Cambiar también <Title poniendo el nombre de la lista.
(Se puede obtener en el sitio de sharepoint personalizando la lista o en "Site Settings > Site Libraries and Lists" mirando el LINK de customize de la lista en cuestión aparece el GUID, con botón derecho del ratón y copiar acceso directo )
La linea quedaría así :
<ListName xmlns="htp://schemas.microsoft.com/WebPart/v2/ListForm">{046F5668-1891-4781-9B44-90AC0C0B600A}</ListName>
7. Generar un nuevo GUID con guidgen.exe o usando la página :http://www.somacon.com/p113.php
8. En la línea <ID poner el GUID nuevo reemplazando los guiones por guiones bajos, dejando un "g_" al principio.
Ejemplo: El GUID es 870850be-fd2c-44d6-818e-ab2914fb2d71 y quedaría así g_870850be_fd2c_44d6_818e_ab2914fb2d71
Quedando así: <ID>g_870850be_fd2c_44d6_818e_ab2914fb2d71</ID>
9. Guardar (No recomiendo guardar antes), es posible que haya que cerrar y abrir la pagina para ver el resultado de la reparación.
10. Repetir la operación para las Páginas NewForm.aspx , EditForm.aspx, DispForm.aspx y todos los vínculos de supporting Files quedaran reparados.
En este punto, habremos reparado la lista, las Alertas y RSS, la acción de Nuevo, Editar y Visualizar por lo que
TODO Funcionaría Correctamente.
Fuente Orientativa (Mirar PostComment): http://blogs.msdn.com/dszabo/archive/2007/02/20/custom-list-newform-aspx-ruined-in-wss-3-0.aspx
He cambiado algunas cosas del procedimiento original para que sea más fácil con un Copy-Paste
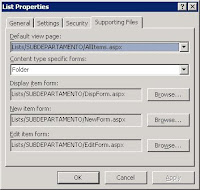
Asi quedarían las supporting Files Antes y Después.

Espero os sea de utilidad, saludos a todos.
RobertoMarcos.com
Todos los service Packs y parches (Hotfix) de Sharepoint
| WSS V2 | SPS2003 | ||||
| Release | Version | KB | Release | Version | KB |
| RTM | 11.0.5530.0 | N/A | RTM | 11.0.5704.0 | N/A |
| SP1 | 11.0.6361.0 | KB841876 | SP1 | 11.0.6715.0 | KB841883 |
| SP2 | 11.0.6568.0 | KB887624 | SP2 | 11.0.8126.0 | KB887623 |
| SP2 Rollup | 11.0.8000.0 | KB900929 | SP2 Rollup | 11.0.8126.2 | KB898547? |
| Aug DST | 11.0.8147.0 | KB941412 | SP3 | 11.0.8168.0 | KB923644 |
| SP3 | 11.0.8165.0 | KB923643 | Post SP3 (Feb) | 11.0.8168.3 | KB941204 |
| Post SP3 (Jan) | 11.0.8205.0 | KB941412 | Post SP3 (Feb) | 11.0.8168.3 | KB943167 |
| Post SP3 (Feb) | 11.0.8209.0 | KB948919 | |||
| Post SP3 (Mar) | 11.0.8210.0 | KB950386 |
|
|
|
| Post SP3 (May) | 11.0.8219.0 | KB952903 | |||
| WSS V3 | MOSS2007 | ||||
| Release | Version | KB | Release | Version | KB |
| RTM | 12.0.4518.1016 | N/A | RTM | 12.0.4518.1016 | N/A |
| Public DST | 12.0.6039.5000 | KB934525 | Public DST | 12.0.6034.5000 | KB937832 |
| SP1 | 12.0.6219.1000 | KB936988 | SP1 | 12.0.6219.1000 | KB936984 |
| Post SP1 (Jan) | 12.0.6300.5000 | KB941422 | Post SP1 (Jan) | 12.0.6300.5000 | KB942819 |
| Post SP1 (Jan) | 12.0.6300.5000 | KB941653 | Post SP1 (Jan) | 12.0.6301.5000 | KB945089 |
| Post SP1 (Feb) | 12.0.6303.5000 | KB948945 | Post SP1 (Jan) | 12.0.6301.5000 | KB941274 |
| Post SP1 (Feb) | 12.0.6303.5000 | KB948957 | Post SP1 (Feb) | 12.0.6303.5000 | KB948947 |
| Post SP1 (Feb) | 12.0.6304.5000 | KB949399 | Post SP1 (Feb) | 12.0.6304.5000 | KB949402 |
| Post SP1 (Mar) | 12.0.6305.5000 | KB949749 | Post SP1 (Mar) | 12.0.6306.5000 | KB949955 |
| Post SP1 (Mar) | 12.0.6306.5000 | KB949956 | Post SP1 (Mar) | 12.0.6307.5000 | KB950280 |
| Post SP1 (Mar) | 12.0.6307.5000 | KB950279 | Post SP1 (Mar) | 12.0.6307.5000 | KB950292 |
| Post SP1 (Mar) | 12.0.6308.5000 | KB950484 | Post SP1 (Mar) | 12.0.6308.5000 | KB950487 |
| Post SP1 (May) | 12.0.6314.5000 | KB952288 | Post SP1 (May)* | 12.0.6314.5000 | KB952294 |
| Post SP1 (May) | 12.0.6314.5000 | KB952292 | Post SP1 (May) | 12.0.6315.5000 | KB952704 |
| Post SP1 (May) | 12.0.6315.5000 | KB952698 | Post SP1 (May) | 12.0.6316.5000 | KB953138 |
| Post SP1 (May) | 12.0.6316.5000 | KB953137 | Post SP1 (June) | 12.0.6317.5000 | KB953471 |
| Post SP1 (June) | 12.0.6317.5000 | KB953473 | Infra Update | 12.0.6318.5000# | KB951297 |
| Post SP1 (June) | 12.0.6317.5000 | KB953484 | Post SP1 (July) | 12.0.6324.5000 | KB955593 |
| Infra Update | 12.0.6318.5000# | KB951695 | Post SP1 (July) | 12.0.6324.5000 | KB955586 |
| Post SP1 (July) | 12.0.6324.5000 | KB955594 | Aug CU | 12.0.6327.5000 | KB956056 |
| Post SP1 (AAM) | 12.0.6324.5001 | KB956248 | Oct CU | 12.0.6331.5000 | KB 958569 |
| Aug CU | 12.0.6327.5000 | KB956057 | Dec CU | 12.0.6335.5000 | KB960011 |
| Aug CU | 12.0.6327.5000 | KB957109 | Feb CU 12.0.6341.5000 KB961749 | ||
| Oct CU | 12.0.6331.5000 | KB957691 | SP2 | 12.0.0.6421 | KB953334 |
| Dec CU | 12.0.6335.5000 | KB960010 | |||
| Feb CU | 12.0.6341.5000 | KB961750 | |||
| SP2 | 12.0.0.6421 | KB953338 | |||
El color amarillo indica los Parches que necesitas para estar actualizado.
RobertoMarcos.com


